When working in a security role you often come across malware or malicious links that pique your interest, but to detonate one of these files or browse to one of these addresses on a machine you regularly use would be detrimental to the security of your own device. Therefore it is imperative that any good security person has a sandbox environment in which to play around with malicious files. Some people opt to keep an old dusty laptop stashed away in a drawer to call upon when the time arises, but this approach can be laborious for a number of reasons.
- When malware is detonated, the machine is compromised and a full reinstall needs to be carried out which takes a long time.
- OS updates and security patches need to be downloaded and installed each time the OS is reinstalled.
- When a machine is compromised, there is a good chance the threat actor could move laterally within your home network.
- It is a whole other device you need to track down and plug in every time you want to use it. This can be a pain if you need to take it on the road (old laptops can be heavy!)
Virtualisation To The Rescue
Virtualisation is the act of running an operating system within an operating system. It is a great way to try out an OS without committing to installing it on bare metal. There are many virtualisation options to choose from; Virtualbox, Hyper-V, Parallels (if you’re on an MacOS), and VMware to name a few. For our purposes we’ll be using VMware Workstation Pro, officially a license costs around £150 from VMware themselves, but there are other sites where keys can be acquired for a fraction of the full price. I am unsure of the legality of these aftermarket keys, so use at your own risk. Now that we’ve acquired our virtualisation software, we next need to decide on an operating system. Use an operating system that is relevant to your use case, for example if you’re curious as to how the EternalBlue exploit works, you’ll need a version of Windows 10 that doesn’t have the 4013429 patch. I’m interested in malware attacks that are relevant to my org, and we have recently made the move to Windows 11 so that’s what I’ll be using. You can find a Windows 11 ISO here.
Setting Up The Environment
Once you have downloaded and installed VMware Workstation Pro and you have your Windows 11 ISO on your machine, within Workstation Pro click File -> New Virtual Machine. Within the Virtual Machine Wizard select the Installer disc image file (iso) radio button and track down your Windows 11 ISO image. Follow the rest of the wizard allocating an appropriate level of disk, memory and CPU cores to your new virtual machine. Start the virtual machine and make your way through the Windows 11 Setup process like you are setting up a new device.
As I am setting up this device to potentially load malicious files onto, I don’t particularly want to log in to my Microsoft account on this VM, so I’ll use a nifty little trick to bypass this requirement during the provisioning stage. Once you have reached the Select Keyboard Layout stage of the setup process, press Shift + F10 to bring up a command prompt window and enter OOBE\BYPASSNRO.

The VM will reboot and eventually bring you back to the Select Keyboard Layout page. Again, press Shift + F10 to bring up a command prompt window and enter ipconfig /release to flush any network connection the VM will have obtained. This allows us to continue setting up the VM offline, bypassing the need to use a Microsoft account. Continue with the setup process until your new Windows 11 VM boots up, restart it and launch Windows Update and install any updates and security patches that are available, set your aspect ratio etc. Do everything you would do to make a device ready to use, and then read on.
Non-Persistence Is Key
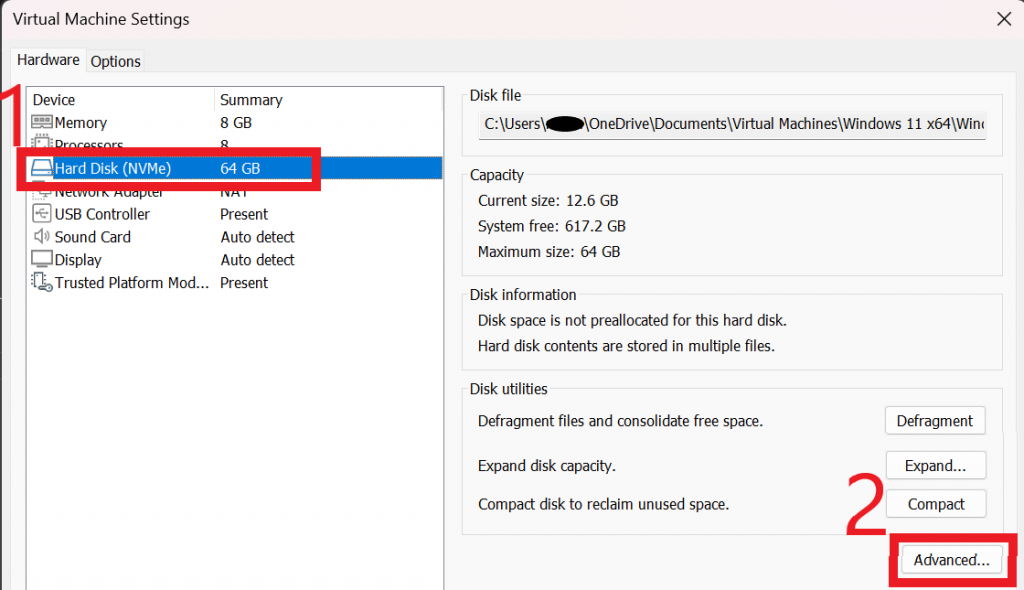
Once we have our guest VM operating system in a state that we are happy with, we are going to switch the virtual hard drive to a non-persistent state. Essentially this means that we will be freezing the operating system and filesystem as it currently is, and any changes we make or files we save when we are using it in the future will disappear when the device is rebooted. First shut down the virtual machine and then right-click on your VM in the Library pane, and click on Settings. From the VM settings menu, click on your Hard Disk and then on Advanced

Within the Hard Disk Advanced Settings dialog box, select your drive, check the box for Independent and select the Nonpersistent radio button.

Et voila! You now have a amnesiac version of Windows 11 that will forget everything that is done to it every time it restarts. If you need to apply patches and updates in the future, it’s just a matter of going back in to the virtual machine settings and taking the virtual hard disk out of Independent Mode, fire up the VM to apply updates and flipping it back to Independent Nonpersistent mode when you’re done!
Come back soon where I’ll discuss networking considerations for a sandbox environment and how to set up secure network access using VMware Virtual Network Editor, and we will delve in to some tools that we can use within our VM to analyse malware as it is executed.
